
Summary
In the previous tutorial I have explained how to setup a basic serial connection between an Atmega16 controller Board and a computer/laptop. In this article we’ll learn how to control a robot using the computer/laptop wirelessly through Bluetooth.
Components Required
1. Atmega16 development board with 16MHz crystal
2. Serial Bluetooth Module(AUBTM/HC-05/HC-04/BLUSMIRF)
3. PC/Laptop running Windows XP/7/8
4. USB Bluetooth(Not required if you laptop/PC has inbuilt hardware)
5. Motor Driver L293D
6. 2 X 12V 100RPM Geared DC motors
7. 2 X Wheels
8. Chassis
9. Castor wheel
10. Female jumper wires
Software Required
Serial Port Software on your PC (RealTerm/HyperTerminal/TeraTerm/Putty/ Your own Program)
Block-Diagram

Mechanical Construction:

Let us start with the hardware assembly part first. It should be simple since we are using a ready-made chassis. Start by attaching the motors and castor wheel to the chassis.

Next attach the wheels to the motor shafts using the screw provided on the wheel.


Connect the wires emerging from the two motors to the output pins of the L293D motor driver.
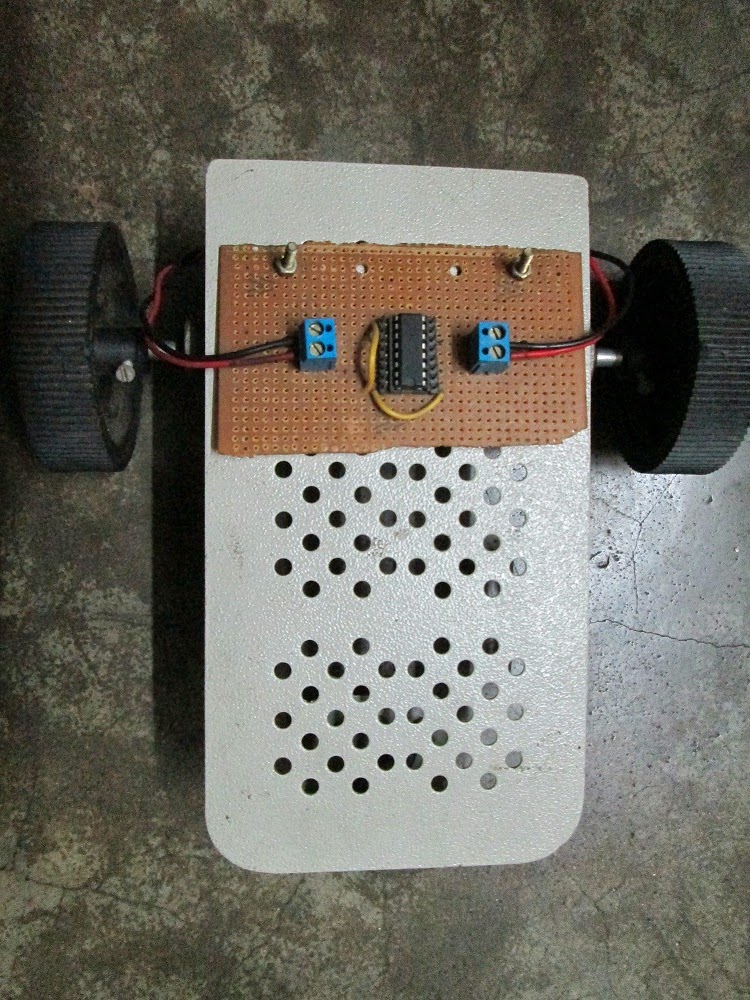
After all connections are made, this is how it looks.
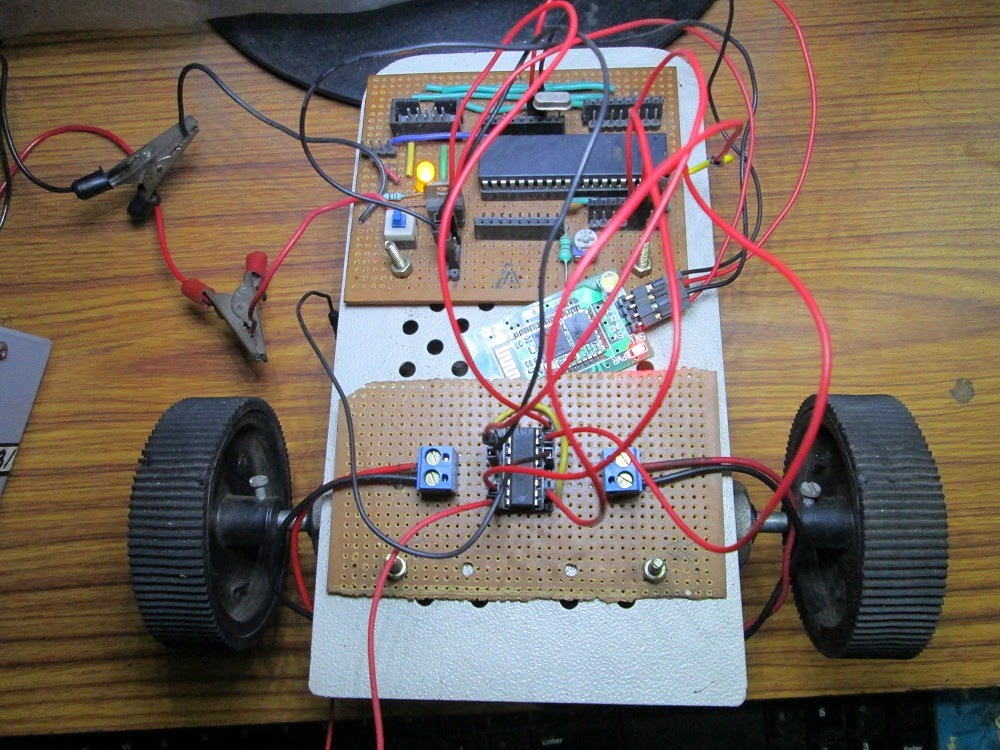
Remember: RX (PIN 14) of controller to TX of modem and TX (PIN 15) of controller to RX of modem.
Code Explanation:
Let us start from the main function.
-Lower nibble of PORT A connected to motor driver are configured as outputs.
-USART of the microcontroller is initialized using the BlueInit() function which sets the baud rate, configures the character sizes and enables the transmission and reception.
-Enter into an infinite while loop.
-Read a byte from the RX line using the “BlueRdChar()” function(waits for a data to be available at the RX pin of the controller, reads it when available and then returns the data which was read to the main function. Note that it is of “unsigned integer” type so it returns an ASCII code value of the character sent) and store it in a variable named “value” which is of type “unsigned char”.
-Write the same data which was stored in the variable “value” into the UDR and send it to the PC through the TX line of the microcontroller using “BlueWrChar(unsigned char d)” function (which waits until the UDR is ready and when it is, it loads the UDR with the data stored in the variable “d” and then the data is sent to the PC through the TX pin of the controller.)
-Check the character present in the variable “value”
If it contains ‘w’ or ‘W’, set the output port such that both motors move forward.
If it contains ‘s’ or ‘S’ , set the output port such that both motors move backward.
If it contains ‘d’ or ‘D’ , set the output port such that left motor moves forward and right motor remains at rest.
If it contains ‘a’ or ‘A’, set the output port such that right motor moves forward and left motor remains at rest.
If it contains a <space> then set the output port such that both the motors stop.
Setup Instructions:
1. You can either compile the code given using a suitable compiler like WINAVR with ATMEL STUDIO/AVR STUDIO or simply burn the “demo.hex” file give below. Before burning the hex file into you microcontroller, remember to change you Fuse bit Settings in order to make your microcontroller run at 16MHz using external crystal.
High fuse=0xC9
Low fuse=0xFF
(Warning: Be very careful while programming the fuse bits. If you set it with wrong values then the microcontroller may be permanently disabled.)
2. Turn on the Bluetooth on your computer and also the circuit setup. Wait for few seconds to let the computer connect to your Development board’s Bluetooth device (Refer the previous tutorial if you are establishing a connection for the first time.)
3. Open the serial communication software in your PC/Laptop i.e. RealTerm/HyperTerminal.
Note: I’m using my own software.
4. If you are using RealTerm then go to the Port Tab and set it as follows.
Baud: 9600
Port: <The port where the Serial Bluetooth Modem is virtually connected to>
Data bits: 8
Parity: None
Stop bits: 1
Hardware Flow Control: None
5. Now try to send some characters. If you have done everything correctly then you should see the following happening:
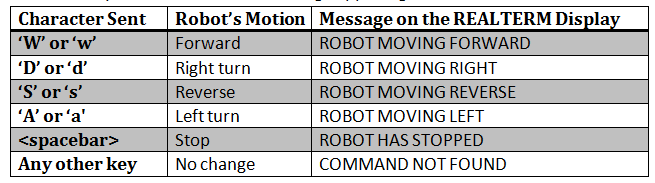
Note: If there is an error in the Robot’s motion, i.e. say the robot moves in reverse direction when we press ‘w’ key instead of moving forward then don’t worry. It’s just because of the wrong connections between the motor driver and Development Board. Just inter change those connections and check again.
YouTube Video
In the previous tutorial I have explained how to setup a basic serial connection between an Atmega16 controller Board and a computer/laptop. In this article we’ll learn how to control a robot using the computer/laptop wirelessly through Bluetooth.
Components Required
1. Atmega16 development board with 16MHz crystal
2. Serial Bluetooth Module(AUBTM/HC-05/HC-04/BLUSMIRF)
3. PC/Laptop running Windows XP/7/8
4. USB Bluetooth(Not required if you laptop/PC has inbuilt hardware)
5. Motor Driver L293D
6. 2 X 12V 100RPM Geared DC motors
7. 2 X Wheels
8. Chassis
9. Castor wheel
10. Female jumper wires
Software Required
Serial Port Software on your PC (RealTerm/HyperTerminal/TeraTerm/Putty/ Your own Program)
Block-Diagram
Mechanical Construction:
Let us start with the hardware assembly part first. It should be simple since we are using a ready-made chassis. Start by attaching the motors and castor wheel to the chassis.
Next attach the wheels to the motor shafts using the screw provided on the wheel.
Connect the wires emerging from the two motors to the output pins of the L293D motor driver.
After all connections are made, this is how it looks.
Remember: RX (PIN 14) of controller to TX of modem and TX (PIN 15) of controller to RX of modem.
Code Explanation:
Let us start from the main function.
-Lower nibble of PORT A connected to motor driver are configured as outputs.
-USART of the microcontroller is initialized using the BlueInit() function which sets the baud rate, configures the character sizes and enables the transmission and reception.
-Enter into an infinite while loop.
-Read a byte from the RX line using the “BlueRdChar()” function(waits for a data to be available at the RX pin of the controller, reads it when available and then returns the data which was read to the main function. Note that it is of “unsigned integer” type so it returns an ASCII code value of the character sent) and store it in a variable named “value” which is of type “unsigned char”.
-Write the same data which was stored in the variable “value” into the UDR and send it to the PC through the TX line of the microcontroller using “BlueWrChar(unsigned char d)” function (which waits until the UDR is ready and when it is, it loads the UDR with the data stored in the variable “d” and then the data is sent to the PC through the TX pin of the controller.)
-Check the character present in the variable “value”
If it contains ‘w’ or ‘W’, set the output port such that both motors move forward.
If it contains ‘s’ or ‘S’ , set the output port such that both motors move backward.
If it contains ‘d’ or ‘D’ , set the output port such that left motor moves forward and right motor remains at rest.
If it contains ‘a’ or ‘A’, set the output port such that right motor moves forward and left motor remains at rest.
If it contains a <space> then set the output port such that both the motors stop.
Setup Instructions:
1. You can either compile the code given using a suitable compiler like WINAVR with ATMEL STUDIO/AVR STUDIO or simply burn the “demo.hex” file give below. Before burning the hex file into you microcontroller, remember to change you Fuse bit Settings in order to make your microcontroller run at 16MHz using external crystal.
High fuse=0xC9
Low fuse=0xFF
(Warning: Be very careful while programming the fuse bits. If you set it with wrong values then the microcontroller may be permanently disabled.)
2. Turn on the Bluetooth on your computer and also the circuit setup. Wait for few seconds to let the computer connect to your Development board’s Bluetooth device (Refer the previous tutorial if you are establishing a connection for the first time.)
3. Open the serial communication software in your PC/Laptop i.e. RealTerm/HyperTerminal.
Note: I’m using my own software.
4. If you are using RealTerm then go to the Port Tab and set it as follows.
Baud: 9600
Port: <The port where the Serial Bluetooth Modem is virtually connected to>
Data bits: 8
Parity: None
Stop bits: 1
Hardware Flow Control: None
5. Now try to send some characters. If you have done everything correctly then you should see the following happening:
Note: If there is an error in the Robot’s motion, i.e. say the robot moves in reverse direction when we press ‘w’ key instead of moving forward then don’t worry. It’s just because of the wrong connections between the motor driver and Development Board. Just inter change those connections and check again.
YouTube Video